Thursday, 2 June 2016

Tutorial - Evaluation


Project 2

Materials and Tools :
- An object's 3D model (obtained from a colleague)
- 123D Make 
- Adobe Illustrator 
- 3mm 30x60cm bamboo plywood
- 1 round 1mm metal sheet
- Laser Cutter, at least can take a sheet of 30x60cm
- Sand Bag
- Nylon Bossing Mallet - Round End
- Nylon Bossing Mallet - Flat End
- Polishing Hammer - Flat End


- Mushroom Dollies, bigger and smaller one, depending on pref


Optional Tools (only if you didnt manage to get an item from a colleague):
- An object
- 123D Catch app
- 123D Make 
- Spray Paints

• Since this is the second project, I have got the idea of what's the right technique to achieve the model


First thing first, get a 3D model from a colleague. If you dont have any colleague, you have to follow the instructions on Project 1 to produce a 3D model of an object that you choose. 

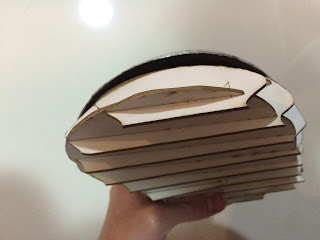
For this project, I choose to make a sectioning model instead of waffling model because waffling model is harder to work with; sectioning model is sturdier, easier to work with, and it is a solid.

So the first step is to make a cutting layout on adobe illustrator. To get the layout, you will need to import your 3D model into 123 Make and make sure that your file is in .STL type. After it's imported to the environment, select the thickness of your material and select SECTIONING on the program. Select the window to preview the sections, then export it into PDF format. Once the PDF is generated, import it into adobe illustrator. The first thing that you might want to do is to tidy up the layout. There are chances that there are small parts that can be inserted into other page. Do this if you feel like saving some space and increace the chance to reduce printing sheets. When the file is in adobe illustrator, make sure that the layout that you want to cut is coloured in RGB red and has a line thickness of 0.001. Once those settings are done, press print and select your laser cutter as your printer. Open the printer program, place your 30x60cm sheet into it, and do some caliberation. Make sure that every thing that you want to be print is in the area where the sheet is placed. Also make sure that the sheet isnt bending. If it's bending, there are chances that it'll not cut through, so you definitely dont want any bend sheets. If the bending isnt bad, just loke a small curve, it still can be used but ofcourse with a risk. If the sheet is bended, you will need to add a couple of pins to keep the sheet in place, depending on how bended it is, more pins might be needed. After all the sheet settings is done, make sure the cover of the printer is closed, dust suction is on, and select the right material and its thickness, in this case it's general medium wood, 2 mill; then press print to start printing. You have to redo the caliberation everytime you want to print to make sure the printer is doing its jobs properly. If the material catches on fire, pause the printer and use the fire extinguisher. Once all sheets have been printed, turn the dust suction and printer off. 

After all parts have been extracted from the frames, the assembly of the model starts by sorting the pieces based on the number that is printed on it. Smallest number should be at the bottom. Once the pieces are in correct order, match the sides and start gluing the pieces to make the model. Make sure that you let the glue dry before working with it.

Once the sectioning model is ready, prepare the tools and material to make the metal skin of the model. The first thing that you need to do will be to determine the centre of the metal plate and draw approximately the major radiuses of the model. This way you will know how much you need to work on every part of the radius. Moving on, next thing that need to be done is shrinking. Same way as project one, you will need o shrinking it to a bowl. In this case, since my model has different layers or different radiuses, the amount of shrinking i need to do varies depending on how thigh the skin needs to be on different layer of the radius. Once you have done enough shrinking to make the skin fits the model, start denting the skin to make closer fit by placing the skin on the model and hitting on the dented area. During the fitting process you might neees to do more shrinking to make it fit better.

Monday, 30 May 2016

Tutorial - Evaluation


Project 1

Materials and Tools :
- An object (in this case a wireless mouse)
- 123D Catch app
- 123D Make 
- Spray Paints
- Adobe Illustrator 
- 3mm 30x60cm bamboo plywood
- 1 round 1mm metal sheet
- Laser Cutter, at least can take a sheet of 30x60cm
- Sand Bag
- Nylon Bossing Mallet - Round End
- Nylon Bossing Mallet - Flat End
- Polishing Hammer - Flat End
- Mushroom Dollies, bigger and smaller one, depending on pref
- English Wheel


  • Since this is the first time I'm doing metal works, I don't know any technique and a proper way of modelling the metal sheet, so I only followed my instinct. 

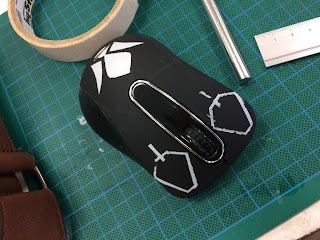
So in the first step, what you are suppose to do is to make a model of an object that you choose using 123D catch. In my case, it's the wireless mouse. Depending on the texture and the colour of the surface, the app might not be able to recognize the model properly and will produce a not so good model. To prevent this, giving some extra texture or colour to the surface will be needed. What I did was to add more colour pattern on the surface.


After making sure that you have enough texture on the surface, start taking pictures on the app. Don't take pictures with the normal camera app since 123D catch can't make models from pictures that you stored on your phone. It can only make models from the picture that you freshly take using the app. To use the app, first, you have to take bunch of pictures in a circular order.
*The video isnt mine, but it explain about the app perfectly


A good 50 photos will most likely give you a good model, but you have to make sure that in the 50 frames, you have take a picture almost all possible surfaces and edges of the model. Once a model that you are happy with has been generated, go to 123D make and dispose the excesses parts of the model. To do this, a third party can also be used as long as it takes .STL file.


After the clean up process, continue the project by making the timber model. It can be either waffling or sectioning. Sectioning will give you a better model to work with since it keeps more detail but definitely will cost you more since it has more plates compared to waffling. Depending on the amount of the details that you want to keep and the thickness of your plywood, the number of sections or waffle cuts might change; you might want to get more slices if there are some important curves on the model.


Once the Layout is ready to be cut, export it into PDF and make the setting for laser cut. The parts that are going to be cut has to have 0.001 line thickness and RGB red. Once the settings of the file is done and all the preparations for laser cut is done, you can begin the cutting process. These are some pictures of what you will be looking at after the laser cut and the assembly of the waffle.


Moving on to the metal sheet. In this part what I did first was to shape the sand bag with a rounded head hammer to form a bowl shape on the bag. Then I put the metal sheet on top and slam it as strong as I can. That give a bowl shape as my initial shape. This step isn't suppose to be like this, the proprer way of doing it is actually by shrinking the metal plate into a bowl shape. 

*This isnt my vide, but the video shows exactly whats to be expected from the shrinking process. The technique is relatively the same. The important thing is that bowl at the end, because that will be the base of the shape

Once the initial shape is there, I decided to use the english wheel since I have the smooth curve edges on the top. The mouse has 2 different curve parts, one for the palm and one for the button. So what I did, instead of using the english wheel all the way, I stop right around the edge of the button. Then I turn it into the opposing edge and start english wheeling again but ionly to the edge of the button again. This will give me 2 different curve of the mouse.


Once the top part is finished, continue curving the front, right, and back part where the palm and fingers are holding the mouse. The reason why you continue with this part is because it is the easier part to curve. The part where the thumb is resting is the hardest part to model since it has double curve. If this part is done first, you will have to model that part again later as when you are curving all the other part, most likely you will lost the double curve that you have done. Once that's done, you will pretty much get the shape, but of course some tweaks will be needed to make it perfectly sitting on top of the waffle model.


The thing that I get a lot from this first project is that the shrinking machine isnt working that well, itll bite your sheet and leave a lot of bite marks. Never use a metal hammer onto a metal forging tools, it'll leave scars on your model. Only use the flat head metal hammer to polish the surface, and you have to make sure that it is flat and shiny. To measure it, the better reflection on the surface of the hammer, the better shiny looks that you will get. I also come to realise that during forging of the shape, depending on the final shape, there are certain steps and sequence that need to be followed in order to get the best result. In this case, forge the most complex curve last. If the curve complex is forge first, most likely it'll lose the the desired curve. Early stage of the forging doesnt need to look close to the final out come; as long as the technique and sequence is right, the final outcome will be easier to forge. The hardest part for this would be the double curve for the thumb resting part. I tried a couple different dolly and hammers, but they didnt work that well. I made a mistake by using the metal hammer while forging the sheet onto the metal dolly, resulting some scars on the surface. For the solution of thos proble, i used a flat nylon mullet on a small mushroom dolly and hit it from outside  on one spot, and then hit it from the inside next to the spot thats dented inward. 


Monday, 16 May 2016

Assignment 2

In this assignment, i made the skin with different approach.

Starting by :
- shrinking the metal plate into a bowl
- carving the general shape of the model
- shrinking it more so that it'll fit in perfectly


At the beginning, i tried to shrink the plate with the shrinker machine, but it end up horriblely resulting some cracks on the sheet. Since it's unsalvageable, I had to trim it. 


After trimming the damaged area, i continue to shrink the bowl even more so that the model can sit on the bowl perfectly.


Once the basic shape is there, I continue modelling the skin by denting the bowl inward, taking the shape of the model. Then shrinking some parts so that it'll take the shape better and let the model sit on the bowl perfectly.

Wednesday, 27 April 2016

Building Process - Laser Cut & Metal Skin

A. Laser Cut 
The waffle is made from 2mm cardboard

B. Metal Plate
The metal skin is made from a 1mm round metal sheet. The process was from transforming it into a bowl first, then continues on forming the complex part on the left side where the thumb rest. After that part is formed, continues with curving the right and back side where the palm is resting

C. Combining the skeleton and skin
 Generally, I'm pretty pleased with the 2 models, they fits perfectly. If i get the chance to improve them, the first thing that I will do would be reforming the skin so that it is more fluid and fits better to the skeleton. Secondly, trying different methods of forming so that I wont't leave so much scar on the metal sheet. Third, make the waffle with more sections and stronger materials such as timber so that the form is clearer to see and easier to work on the skeleton

Making Process - Model Making

Since the previous model didnt turn out well, I had to repeat the process a couple of times. The other thing that I tried is also to increase the amount of picture per project so that the program would have more information to make the model.

https://www.dropbox.com/sh/5i8d9jtg0pnz4de/AAAnlFlFJY8ubxKC_9qq2CILa?dl=0


A. First try (Plain Mouse)
The file turn out very bumpy and the mouse model didn't even imported since in the model it was only a skin of it

 B. Third try (after painting the mouse) 
The model is imported perfectly, even though there are a lot of accesses surrounding model 

C. Importing the model into Rhino
Since 123D make crashes too often, I decide to import it into a different environment. In rhino, I manage to remove the accesses models (base) so that they won't be included in the waffling model. In order to remove the accesses model, I had to unweld the edges of the model, producing more than 50,000 mesh, then start removing them bit by bit.

D. Result after cleaning up in Rhino
After cleaning the accesses model, the file is imported back to 123D make to make some settings for making the waffling skeleton

E. Waffle making
I decided to make the waffle 4x10. I tried to increase the number of the sections, but it shows that there will be some problems 


Making Process - Mouse Modification

In the process of doing this assignment, the major problem that I encountered were :

1. Getting a good model
2. Editing the model for printing purpose


Getting a good Model
The object is a mouse, and because of the surface that's completely black without any other color on it, the program couldn't recognize the surface properly resulting in a model with bumpy surface. The solution to this problem was to add more colors or ornaments on the surface so that the area of the surface is recognizable.