Tutorial - Evaluation
Project 1
Materials and Tools :
- An object (in this case a wireless mouse)
- 123D Catch app
- 123D Make
- Spray Paints
- Adobe Illustrator
- 3mm 30x60cm bamboo plywood
- 1 round 1mm metal sheet
- Laser Cutter, at least can take a sheet of 30x60cm
- Sand Bag
- Nylon Bossing Mallet - Round End
- Nylon Bossing Mallet - Flat End
- Polishing Hammer - Flat End
- Mushroom Dollies, bigger and smaller one, depending on pref
- English Wheel
- English Wheel
- Since this is the first time I'm doing metal works, I don't know any technique and a proper way of modelling the metal sheet, so I only followed my instinct.
So in the first step, what you are suppose to do is to make a model of an object that you choose using 123D catch. In my case, it's the wireless mouse. Depending on the texture and the colour of the surface, the app might not be able to recognize the model properly and will produce a not so good model. To prevent this, giving some extra texture or colour to the surface will be needed. What I did was to add more colour pattern on the surface.
After making sure that you have enough texture on the surface, start taking pictures on the app. Don't take pictures with the normal camera app since 123D catch can't make models from pictures that you stored on your phone. It can only make models from the picture that you freshly take using the app. To use the app, first, you have to take bunch of pictures in a circular order.

*The video isnt mine, but it explain about the app perfectly
A good 50 photos will most likely give you a good model, but you have to make sure that in the 50 frames, you have take a picture almost all possible surfaces and edges of the model. Once a model that you are happy with has been generated, go to 123D make and dispose the excesses parts of the model. To do this, a third party can also be used as long as it takes .STL file.


After the clean up process, continue the project by making the timber model. It can be either waffling or sectioning. Sectioning will give you a better model to work with since it keeps more detail but definitely will cost you more since it has more plates compared to waffling. Depending on the amount of the details that you want to keep and the thickness of your plywood, the number of sections or waffle cuts might change; you might want to get more slices if there are some important curves on the model.

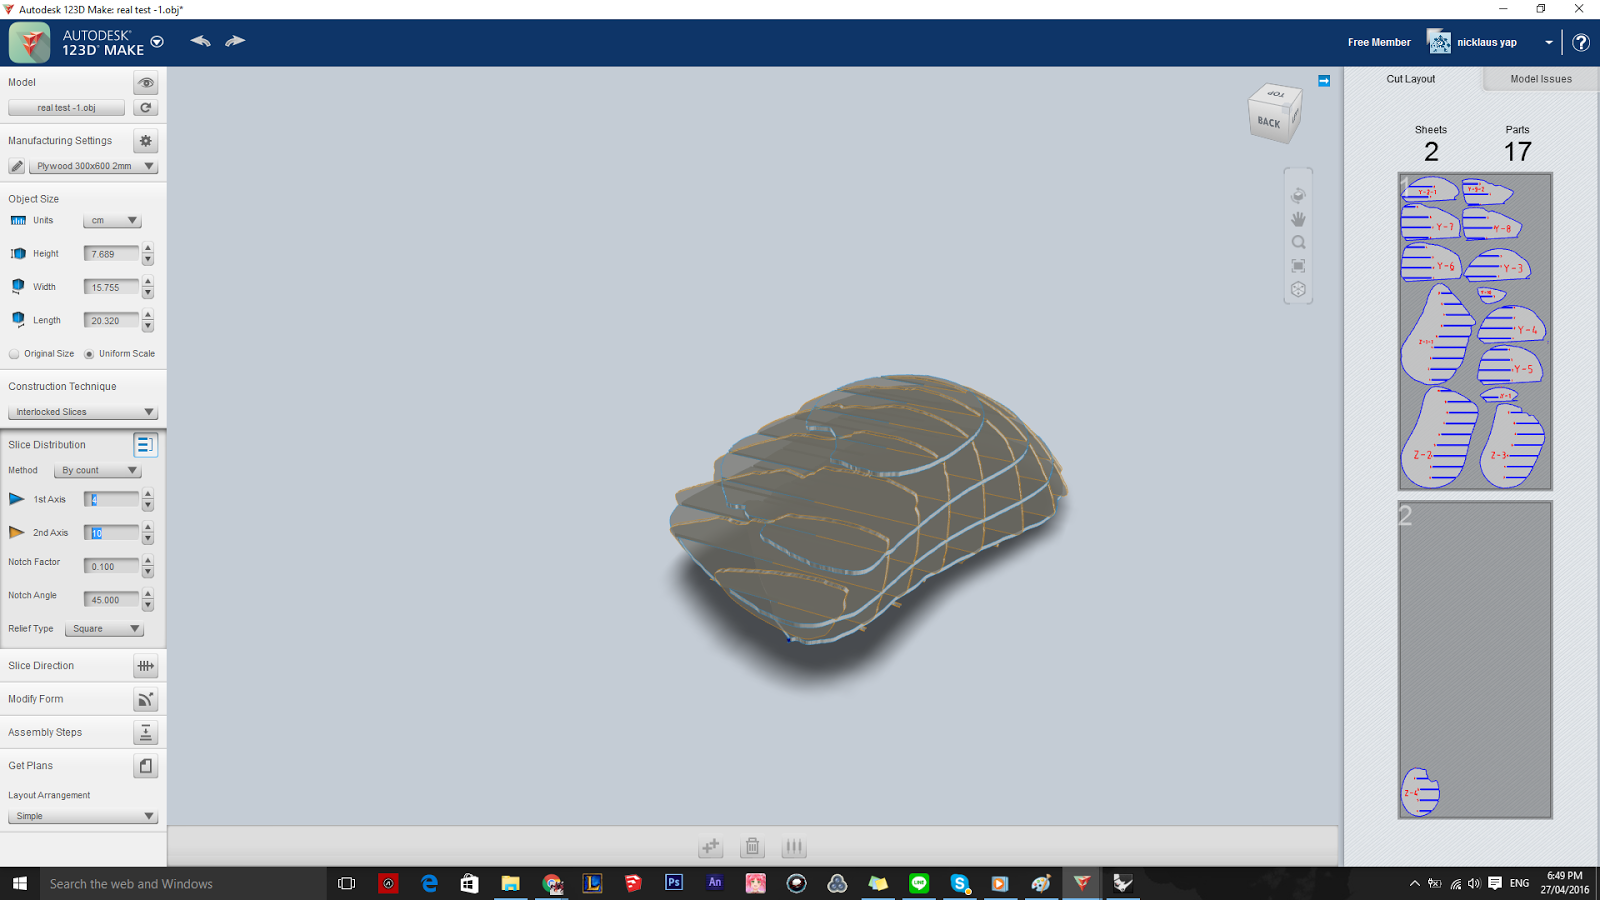
Once the Layout is ready to be cut, export it into PDF and make the setting for laser cut. The parts that are going to be cut has to have 0.001 line thickness and RGB red. Once the settings of the file is done and all the preparations for laser cut is done, you can begin the cutting process. These are some pictures of what you will be looking at after the laser cut and the assembly of the waffle.


Moving on to the metal sheet. In this part what I did first was to shape the sand bag with a rounded head hammer to form a bowl shape on the bag. Then I put the metal sheet on top and slam it as strong as I can. That give a bowl shape as my initial shape. This step isn't suppose to be like this, the proprer way of doing it is actually by shrinking the metal plate into a bowl shape.

*This isnt my vide, but the video shows exactly whats to be expected from the shrinking process. The technique is relatively the same. The important thing is that bowl at the end, because that will be the base of the shape

Once the top part is finished, continue curving the front, right, and back part where the palm and fingers are holding the mouse. The reason why you continue with this part is because it is the easier part to curve. The part where the thumb is resting is the hardest part to model since it has double curve. If this part is done first, you will have to model that part again later as when you are curving all the other part, most likely you will lost the double curve that you have done. Once that's done, you will pretty much get the shape, but of course some tweaks will be needed to make it perfectly sitting on top of the waffle model.


The thing that I get a lot from this first project is that the shrinking machine isnt working that well, itll bite your sheet and leave a lot of bite marks. Never use a metal hammer onto a metal forging tools, it'll leave scars on your model. Only use the flat head metal hammer to polish the surface, and you have to make sure that it is flat and shiny. To measure it, the better reflection on the surface of the hammer, the better shiny looks that you will get. I also come to realise that during forging of the shape, depending on the final shape, there are certain steps and sequence that need to be followed in order to get the best result. In this case, forge the most complex curve last. If the curve complex is forge first, most likely it'll lose the the desired curve. Early stage of the forging doesnt need to look close to the final out come; as long as the technique and sequence is right, the final outcome will be easier to forge. The hardest part for this would be the double curve for the thumb resting part. I tried a couple different dolly and hammers, but they didnt work that well. I made a mistake by using the metal hammer while forging the sheet onto the metal dolly, resulting some scars on the surface. For the solution of thos proble, i used a flat nylon mullet on a small mushroom dolly and hit it from outside on one spot, and then hit it from the inside next to the spot thats dented inward.
No comments:
Post a Comment